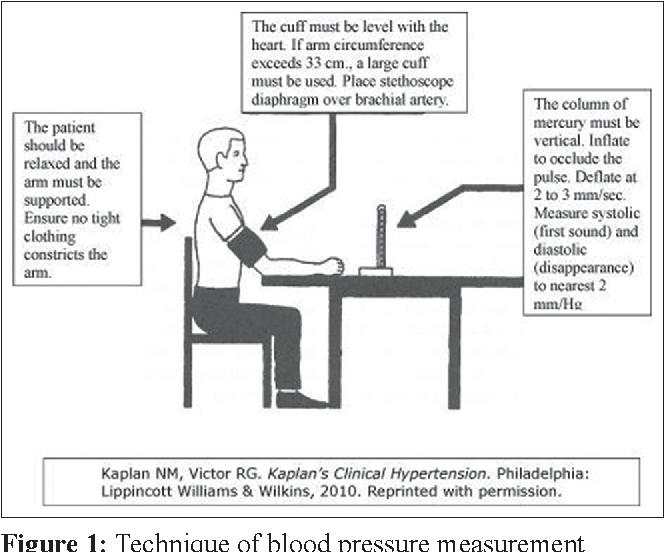
Follow the steps below in order to get the best results from use of the aneroid sphygmomanometer when measuring a patient’s blood pressure, taking care to avoid some common errors.
1. Properly expose the patient.
The blood pressure should be measured during the secondary examination, which begins with exposing the patient. This will ensure that the cuff is placed on the skin. The blood pressure cuff should never be placed over clothing, as doing so will increase pressure on the cuff and produce an inaccurate reading.
2. Properly position the patient.
The patient should be seated comfortably, with the legs uncrossed. The artery used to measure the blood pressure should be close to the level of the heart, with the arm supported.
3. Select the appropriate cuff.
A cuff should be selected that’s able to completely encircle the patient’s upper arm with 80% of the cuff. If it takes more than 80% of the cuff to encircle the upper arm, the cuff is too small for the patient, and will produce a reading that’s higher than accurate. If it takes less than 80% of the cuff to encircle the upper arm, the cuff is too large, and will produce a reading that’s lower than accurate.
4. Palpate the artery.
With the arm fully extended, feel for the pulsation of the brachial artery. Failure to fully extend the arm will result in difficulty both in locating the artery and in auscultating Korotkoff sounds. In most people, the pulse can be felt at the medial aspect of the antecubital fossa, where the artery comes closest to the skin.

5. Properly position the cuff.
The lower margin of the cuff should be positioned 1 inch above the point where the pulse was located, and should be snug to the arm. In actual practice, it’s difficult to make the cuff too tight to the arm; it’s quite easy to make it too loose. Locate where the bladder is sewn into the cuff, and ensure that the bladder is positioned over the artery in order to properly occlude blood flow when the cuff is inflated.
6. Use palpation to estimate the systolic blood pressure.
While palpating the radial pulse, inflate the cuff until the pulse disappears. Release the pressure until the pulse returns, and note the reading on the sphygmomanometer at this point. This is your palpated systolic blood pressure.
Note that many EMS professionals and clinicians skip this step in favor of obtaining an immediate auscultated pressure, which can lead to an underestimation of the systolic blood pressure in the presence of an auscultatory gap–a condition in which Korotkoff sounds disappear for a range of up to 30 mmHg before reappearing.1Typically noted during Phase 2, the auscultatory gap has been associated with serious vascular disease and chronic hypertension.2 As with pericardial tamponade, only through the use of an aneroid sphygmomanometer are we able to observe this clinically significant finding, which in turn can inform our diagnostic decisions.
7. Inflate the cuff to 30 mmHg above the palpated systolic pressure.
You should strive to inflate the cuff to 30 mmHg above the palpated systolic pressure–no more and no less. This avoids both under- and over-inflating the cuff.
8. Slowly release the pressure while looking straight-on at the sphygmomanometer.
Looking at the face of the manometer at an angle can result in parallax error–an inaccurate measurement due to optics.
References
1. Blank SG, West JE, Mà¼ller FB, et al. Characterization of auscultatory gaps with wideband external pulse recording. Hypertension. 1991;17(2):225—233.
2. Cavallini MC, Roman MJ, Blank SG, et al. Association of the auscultatory gap with vascular disease in hypertensive patients. Ann Intern Med. 1996;124(10):877—883.
